
Disclosure: This post contains no affiliate links — just a fun creative tutorial for you to enjoy!
📝Introduction
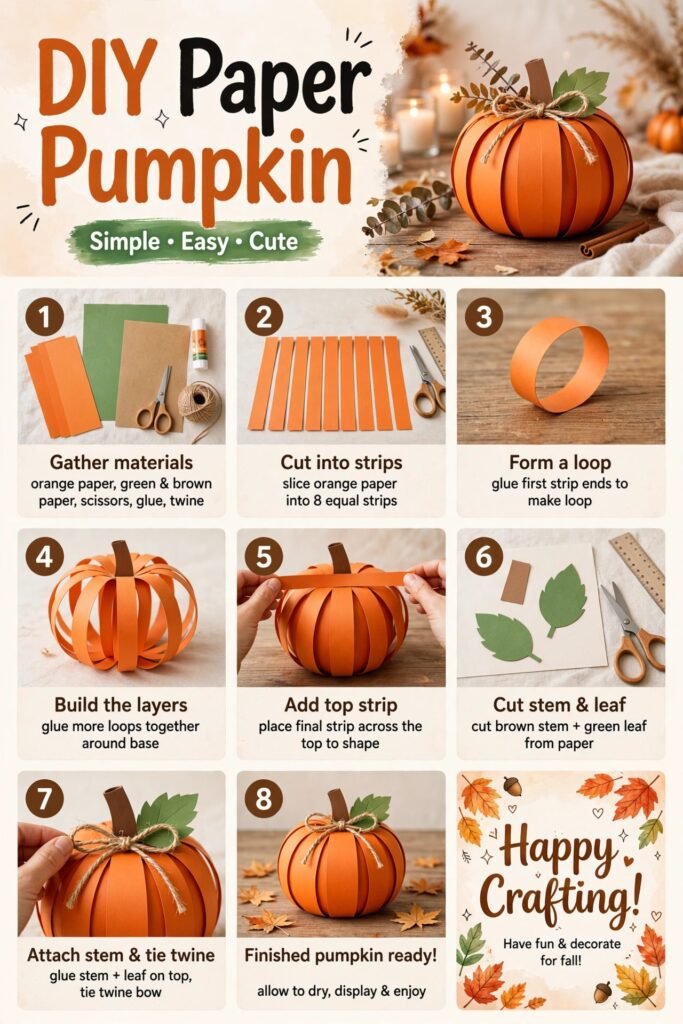
DIY Paper Pumpkin is the perfect fall craft — simple enough for beginners, quick to make, and absolutely adorable! With just a few basic supplies, you can create beautiful handmade pumpkins to decorate your home for autumn and Halloween. No special skills needed — let’s get crafting! ✂️🍂
📋 What You’ll Need
- 🎃 Orange paper (cardstock works best)
- 🌿 Green paper
- 🪵 Brown paper
- ✂️ Scissors
- 🍯 Glue
- 🧶 Twine or string
📖 Step-by-Step Tutorial
1️⃣ Gather Your Materials
Collect everything you need: orange paper, green and brown paper, scissors, glue, and some twine. Cardstock works best for a sturdier pumpkin, but regular construction paper works too!
2️⃣ Cut Into Strips
Take your orange paper and slice it into 8 equal strips. They don’t have to be perfect — close enough is just fine!
3️⃣ Form Your First Loop
Take one strip, add a dot of glue to both ends, and press them together to make a circle or loop. This is your first pumpkin rib.
4️⃣ Build the Layers
Keep gluing more strips together at the top and bottom. They’ll naturally curve outward, creating that classic round pumpkin shape. Keep going until all 8 strips are connected!
5️⃣ Add the Final Strip
Place one last strip across the very top — this pulls all the loops together and gives your pumpkin its perfect shape. Hold it for a minute while the glue dries.
6️⃣ Cut Your Stem & Leaf
While the pumpkin dries, cut a small rectangle from brown paper for the stem and a simple leaf shape from green paper. Easy peasy!
7️⃣ Attach & Tie
Glue the stem and leaf to the top center of your pumpkin. Then wrap a piece of twine around the stem and tie a cute little bow. It adds such a lovely finishing touch! 🎀
8️⃣ Display & Enjoy!
Let everything dry completely. Then place your paper pumpkin on your mantel, dining table, shelf, or anywhere that needs a little fall warmth. Beautiful! ✨
💡 Pro Tips
- ✅ Thicker paper = sturdier pumpkins. Cardstock holds its shape best.
- ✅ Make them in different sizes! Just cut longer or shorter strips for big pumpkins and tiny mini ones.
- ✅ Add a cinnamon stick instead of a paper stem for a cozy, real autumn scent.
- ✅ Group 3–5 together on a tray for instant fall centerpiece magic.
- ✅ Kids love this one! Safe, simple, and they’ll be so proud of their creations.
🎨 Make It Your Own
- 🖌 Paint or dot patterns on the paper before folding
- ✨ Add glitter glue along the edges for sparkle
- 🖊️ Write names on them — perfect as place cards for Thanksgiving dinner
- 🧵 Use ribbon instead of twine for a more elegant look
💭 Final Thoughts
This paper pumpkin craft proves that you don’t need expensive supplies to make something beautiful. In about 15 minutes, you can have handmade decor that brings warmth and charm to your home all season long.
Make one, make a whole patch — invite the kids, put on some music, and enjoy the process. Happy crafting, and happy fall! 🍁🎃✨
📌 You Might Also Like
- 🍂 10 Minute Minimalist Halloween Garland →
- 🕯️ KEKETO Black Cheesecloth Table Runner — ⭐4.6 · 4,162 Reviews · $8.99→
- 👻 JOYIN Halloween Foam Tombstones — ⭐4.1 · 3,279 Reviews · $18.99